Showing posts with label bread. Show all posts

Friday, August 10, 2012

Pao de Queso

Have you ever been to a Brazilian churrascaria such as Texas de Brazil or Fogo de Chao? If you have, then you've definitely had these delectable little cheese poufs. They are chewy, soft, and cheesy. If you've never had them, make this recipe now. You can thank me later.

What is even more awesome is that everything gets blended in a blender. That's it. You are done. Stick it in the oven and you have appetizers for your dinner.


Ingredients
1 ½ cups of parmesan cheese (you can also use swiss, cheddar, or any other grate-able cheese)
1 ½ cups of corn oil
1 cup whole eggs
2 ½ cups of tapioca starch (often found in Asian grocery stores)
1 cup of 2% milk (we used whole milk)
Several pinches of salt


Directions

1. Blend all ingredients in a blender.

2. Spray a mini-muffin tin with vegetable oil. Pour mix into cup tray filling each to the top.

3. Place it in oven 350 degrees for 15min, until light brown.

4. The bread should be baked and served immediately, so you can truly enjoy its full flavor. This can be frozen and reheated, but fresh is probably best.

Probably the easiest appetizer you can ever make!

Friday, July 20, 2012

Paris Fridays: Au Levain D' Antan


Every year there is a baking competition across France for the top baguette in the country. The bakery that wins this distinction is able to provide their baguettes to the French government for a year! We trekked out to Au Levain D' Antan in Montemartre to try the 2011 winner and boy was it worth the trip. 

The baguette was perfectly crunchy on the outside and soft and chewy in the center. We were so delighted with our first baguette that we returned to purchase another to take back to our place for a midday snack with cheese. If you can imagine the little mouse from the movie, Ratatouille, holding the baguette and listening for the delicate crackle of the crust, that was us outside of the adorable little bakery. 

Have a fun-filled weekend! 


Monday, July 2, 2012

Chocolate Chip Zucchini Bread


Our neighbors have a thriving garden with tomatoes and zucchinis, which they graciously share with us once various items ripen. We were lucky to receive 2 zucchinis from them a few days ago, which prompted me to try this recipe. (I thought there was vanilla in the recipe, hence its inclusion in the picture, but there wasn't!) 

This recipe was tweeted by the Food Network and it was only until later did I realize it was Paula Deen recipe. This often means two things: too much sugar and too much fat. However, since this recipe did not have butter (her usual poison), I decided to give it a try. (I included the parchment paper lining suggestion because both of my loafs got stuck on the bottom despite using non-stick spray.)

When I attempt new baking recipes, I usually try to follow it exactly to see if it is worth making and then proceed to make substitutions for health reasons for future attempts. I will definitely be cutting the sugar and making some substitutions for the oil in the future with this recipe. However, I must say that this recipe is quite good. The result was moist and tender bread that conveniently hid the fact that it was vegetable based. The Husband made 2 slices disappear within minutes, so I guess he liked it too! 

* If you read the 842 reviews, you'll find many suggestions for substitutions for sugar and oil. 

Ingredients
3 1/4 cups all-purpose flour
1 1/2 teaspoons salt
1 teaspoon ground nutmeg
2 teaspoons baking soda
1 teaspoon ground cinnamon
3 cups sugar
1 cup vegetable oil
4 eggs, beaten
1/3 cup water
2 cups grated zucchini
1 teaspoon lemon juice
1 cup chopped walnuts or pecans or chocolate chips 

Directions
1. Preheat oven to 350 degrees F. Prep 2 standard loaf pans, sprayed with nonstick spray, and line bottom of pan with parchment paper.

2. In a large bowl, combine flour, salt, nutmeg, baking soda, cinnamon and sugar. In a separate bowl, combine oil, eggs, water, zucchini and lemon juice. 

3. Mix wet ingredients into dry, but don't over mix. Add nuts/chocolate chips and fold in. 

4. Bake for 1 hour or until a toothpick/skewer comes out clean. Alternately, bake in 5 mini loaf pans for about 45 minutes.

5. Remove from oven and allow to cool in pan for 20 minutes. Then remove from pan and cool completely. 

Hope you have a great Monday! 


Monday, October 10, 2011

Rosemary Bread

This post is dedicated to two amazing people, J & V, whom I've known since 1st grade and who are also getting married to each other this week. I get to make a trip to our childhood town (it's been a long time) and celebrate their wedding day!

The backstory to this bread is that V proposed to J by asking their local, favorite bakery to bake a ring into their signature rosemary bread (how cute!). Unfortunately, the ring was in the middle of the bread so J had to eat a lot of bread (with the prodding of V) before realizing what was about to happen.

To add to the beauty of this story, the recipe was on the back of their gorgeous wedding invitation, which J drew by hand. I just had to try this recipe out in honor of their big day. :)


Rosemary Bread by Amy's Bread
Makes 2 loaves of bread

Ingredients
1/4 cup warm water
1 cup cool water
1 tsp active dry yeast
2 cup starter (below)
3 tbsp extra virgin olive oil
1/4 cup fresh rosemary leaves, chopped
3 cup unbleached all purpose flour
1/2 cup organic whole wheat flour
1 tbsp + 2 tsp kosher salt
_______________________________________
Starter
1/4 tsp active dry yeast
1/4 cup very warm water (105-115 F)
3/4 cup cool water (76-78 F)
1 1/2 cup + 2 tbsp unbleached all purpose flour

Directions
1. Stir the yeast, warm water, and starter in a large bowl until yeast dissolves. Let stand 3 minutes.

2. Then add cool water, olive oil, and rosemary. Mix.

3. Add all purpose and whole wheat flour and salt. Mix together into a ball.

4. Knead dough for approx. 7 minutes until smooth and supple. Cover and let rest for 20 minutes.

5. Return dough to lightly floured surface, knead 2-3 minutes until soft and loose.

6. Place dough in a lightly oiled bowl. Cover and let rise for 1 hour. Then fold dough onto itself a few times and let rise again for another hour.

7. Place dough in a lightly floured surface, divide into 2 loaves. Form dough into 2 tight balls.

8. Cover a sheet pan with parchment paper and sprinkle with cornmeal. Place dough on to parchment paper. Cover and let rise until doubled in size, about 1 1/2 hours.

9. Mist tops of loaves with water. Using a lame blade cut a shallow tic-tac-toe pattern on top of each loaf.

10. Slide loaves onto a baking stone, which had been preheated at 450 F. Bake for 20 minutes. Then reduce temperature to 400 F and bake 10-15 minutes longer until the loaves are light brown and sound hollow when tapped on bottom.

* Note: My first loaf got a little burnt based on these instructions so for the second loaf I only baked for 20 minutes at 450 F and then removed from oven to cool. The result was identical, but with a less burnt top.


11. Place on a cooling rack. Enjoy while still warm and crusty.


I've never made bread that has had to rise over the course of several hours, but the results are amazing. The center was super fluffy and chewy in texture and the crust was crisp and crunchy. Being my first bread that wasn't based on Artisan Bread in 5 minutes a Day like here and here, this was quite flavorful with strong notes of rosemary and a good amount of salty bite. This would be fabulous dipped in some high quality extra virgin olive oil and balsamic vinegar.

Congrats J & V. Can't wait to see you both on your wedding day. :) 

Have a love-filled Monday!

Wednesday, August 24, 2011

Dining In: Cary, NC - La Farm Bakery

We rarely make the trek to Cary/Raleigh. Although it's really not that far, it just feels far in our minds. For this place though, we would happily make that trek on a weekly basis if possible. La Farm Bakery is a bakery and cafe that specializes in French-inspired foods and baked goods. 


While Chocolate Mini Baguette. (To die for!) 


Beautiful cheesecakes, fruit tarts, and chocolate tortes.


Chicken and Duck Liver Paté with an Old Style French Baguette.


We polished off the paté within 24 hours, which left us craving for more. The Sister, who doesn't usually enjoy paté, actually found it quite delicious. This place is perfect for breakfast, lunch, dinner... dessert...snack. Pretty much any excuse you can find to eat here is totally worth it. 

What other fabulous bakeries are there in the Triangle area? 


Wednesday, July 6, 2011

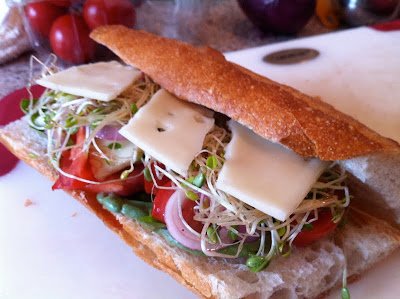
Gazpacho Sandwich

We went crabbing again over the July 4th weekend with our friends B. and A.McD. We stocked up on specialty root beers for the trip while our friends remembered that we needed to eat lunch at some point during the crabbing adventure. 

A.McD packed us these Gazpacho Sandwiches that I am now obsessed with. Since we were under the sun for 5+ hours, this sandwich was the perfect lunch. Light, refreshing, and flavorful. I had to share this because it is simple to make and really delicious. Thanks A.McD for the recipe and for introducing us to these yummy sandwiches. 

Gazpacho Sandwich

Ingredients
1/2 of an 8oz. loaf baguette-style French bread
3/4 cup yellow pear-shape and/or cherry tomatoes, quartered
2 oz. fresh mozzarella cheese, cubed
1/4 cup coarsly chopped cucumber
2 thin slices red onion, separated into rings
1 Tbsp. snipped fresh mint
1Tbsp. red wine vinegar
1 tsp. olive oil
1/4 tsp. salt
1/8 tsp. white pepper
1/2 cup fresh basil leaves

Directions
1.  Cut bread in half crosswise.  Slice each piece horizontally, making bottom piece slightly larger than top piece.  Using a fork, carefully hollow out bottom pieces, making 1/4 in. shells. (I actually did not hollow out the sandwich because we were quite hungry, but it still worked beautifully). 

2.  In medium bowl, combine tomato, mozzarella cheese, cucumber, red onion, mint, vinegar, oil, salt, and white pepper.

3. Line bottoms of bread shells with basil leaves.  Fill shells with tomato mixture; replace tops of bread.  Wrap each sandwich in plastic wrap. Chill for 4-24 hours.  Makes 2 servings.


I used Jarlsberg cheese because we didn't have any fresh mozz at home. 


A wonderful treat for hot summer days. Since these sandwiches need to be chilled, they are really great for picnics or beach trips because you can make them in advance. 

For a real recipe for gazpacho soup, check out our friends' blog

Hope you are able to stay cool this Wednesday! 

Wednesday, June 15, 2011

Parmesan Cheese Bread

I'm a fan of any kind of bread that involves cheese. So, it was time for me to graduate from the simple boule, pain d' epi, and baguettes to something that involved more flavor. 

I used the same dough recipe for making the boule, also known as the Master Recipe in this book. Thankfully, it is a "no-knead" dough and just involves some yeast, flour, salt, and water.


After 2 hours.


I then rolled out a grapefruit sized piece of the dough and folded some parmesan cheese into the layers. 

The finished product: 


It was cheesy perfection. We, of course, tore into the bread before it was fully cooled, which meant that there was warm, oozy cheese throughout the bread. We'll definitely be making this one again for guests. 

Hope you can find something NEW to make this week! 

I leave for Puerto Rico tomorrow, so no new posts for a while, but I promise I'll be documenting our food adventures all along the way to report back. :) 

Monday, May 9, 2011

Potato-Filled Samosas

After a tasty empanada attempt, I was inspired to make something vegetarian (and eventually vegan). Naturally, samosas came to mind when thinking about something yummy wrapped around something doughy. 

This recipe naturally also comes from "How to cook everything" by Mark Bittman. These samosas are potato filled, but you can have any variety of fillings. 

Ingredients
1 1/4 lbs baking potatoes (russet, idaho), cubed 1/2 inch
2 cups all-purpose flour, additional for kneading
1 tsp salt
8 tbsp (1 stick) butter
2 tbsp plain yogurt, sour cream, or buttermilk
1 tbsp ice water, plus more as needed
1 cup onion, chopped
1 fresh chile, minced, or cayenne pepper to taste
1 tbsp minced garlic
2 tsp peeled and minced/grated ginger
1/2 tbsp garam masala (not in original recipe, but was recommended in other recipes)
1/2 tbsp all-purpose curry powder
salt and freshly ground black pepper to taste
1/2 cup green peas (fresh/thawed)
vegetable oil for frying or lightly greasing baking sheet 

Directions
1. Boil potatoes until tender. Drain and let cool.

2. Place flour and 1 tsp salt in food processor, pulse a few seconds to mix. Cut half of butter into small pieces, add to the flour and turn on machine and let run until butter and flour are combined. Add yogurt, sour cream, or buttermilk and pulse a few times. Then, with machine running, add ice water 1 tbsp at a time through feed tube. The instant the dough forms a ball, stop adding water. 


3. Knead the dough for 1 minute by hand, then cover with plastic wrap or a damp towel and set aside. 


4. Place remaining butter in a large skillet, preferably nonstick, and turn to medium heat. Add onion and chile/cayenne and cook until onion softens, about 5 minutes. Add the garlic, ginger, garam masala and curry powder. Add salt and pepper and cook, stirring for about 2 minutes. Add potatoes and peas, raise the head a little. Cook potatoes until they begin to brown, stirring frequently, about 10 minutes. Taste and adjust seasoning as needed. Let cool while you roll out the dough. 


5. Knead the dough for a few seconds, sprinkling it with a little flour if necessary. This is where I deviated from Bittman's recipe. Rip off a racquet ball-sized piece of dough and roll into a long oval. Then cut oval in half. 


6. Wet half of the flat edge and fold dough over to make a small "snow-cone" cup. Seal the seam with your fingers. Fill with potato and peas. Don't over fill or you will get samosas that pop open. 


7. Wet the rounded edge of the dough and fold it down over the potatoes and peas. Seal tightly. Here is a video demonstrating this "pyramid technique." 


8. Either fry in vegetable oil or lightly grease a baking sheet and bake at 350 degrees for 20-30 minutes. I would add either an egg white or milk wash to enhance the browning, as the unwashed samosas below are a little sad and pale. 


Spicy, curry-filled, and delicious goodness in a bite-sized package. These are also fabulous with mango or any kind of chutney. 


Enjoy your Monday!

Friday, April 22, 2011

Dining In: Asheville, NC

My weekend in Asheville was filled with time at the gorgeous spa at Grove Park Inn, leisurely walks around eclectic little shops (where I found a sun hat!), and lots of yummy food. (The Husband was there for a conference so he probably had much less fun than I did :P).  One of our stops was Bouchon Street Food, which is a more casual version of the full-on French restaurant next door (called Bouchon, of course). 

The food was undeniably French with country style pork and duck pate, a ham and cheese crepe with a duck egg, and escargot! It was SO good. 


For a late brunch, we braved the long lines at Tupelo Honey Cafe. Luckily, we got seated at the bar where we could watch while our food was being prepared. After the long wait, the biscuits and black raspberry jam hit the spot. So did the fried green tomatoes with goat cheese grits. YUM.  

The Eggs Beddy was delicious, although I wished my yolk was a little more runny, and The Husband's fried chicken and biscuits were surprisingly good for fried white meat!


We then ventured to Chocolate Fetish for some scrumptious chocolate treats. Flavors pictured include Champagne, Dragon's Breath (wasabi and sesame), Basil Pistachio, and Pistachio Frog.


Final stop before heading home was at Ultimate Ice Cream, which reportedly is some of the best ice cream that some reviewers have ever tasted. The Flaky Coconut and Butter Pecan were true to flavor and wonderfully creamy. 


All in all, Asheville is a little treasure in the mountains. We'll definitely be returning for more. 

Have a great weekend!