Friday, September 24, 2010

Spaghetti alla Carbonara

I typically avoid all dishes with bacon primarily for health reasons. However, the idea that you can have a creamy, bacon-flavored pasta dish was just too appealing not to try. After this dish, I might now be bacon's newest convert.

We followed Mark Bittman's recipe found in How to Cook Everything to the T, which meant that we didn't include any vegetables... (why vegetables if you've got bacon!)

First, crisp 4 oz of minced bacon in a tablespoon of olive oil. Make sure you cook it long enough to bring out enough aroma and crispiness.


While your bacon is crisping, throw your pasta into salted boiling water.


During this prep time, grate 1 cup parmesan cheese (or any other hard cheese).


Also, warm up a glass bowl either in your oven or by pouring hot water into it. I kept my bowl on the stovetop to keep it warm while everything else was prepping.


In the hot (dry) glass bowl, whisk 2 eggs with your cup of cheese. This should create a custard consistency as the egg gets minimally cooked by the warmed bowl.


Throw your HOT pasta noodles into the egg and cheese mixture and mix with bacon pieces (and, if you'd like, some of the bacon grease for extra flavor). Add pepper and salt to taste and plate!


Spaghetti alla Carbonara.


molto delizioso!

Happy Friday!!!

Wednesday, September 15, 2010

Rainbow Chard

Similar to its cousin, Swiss Chard, the Rainbow Chard at Whole Foods was just too beautiful and vibrant to put down. At $2.50 for a large bunch, I couldn't resist trying this fabulous vegetable!


I washed and separated the stem and leaves since the stems tend to take longer to cook.


Add some olive oil into the pan and saute some garlic until fragrant. Add the leaves and cook until wilted. Add salt and pepper to taste. Remove leaves from the pan and then cook the stems similarly but until tender. Toss leaves back in with stems and stir.

Add some lemon zest over the rainbow chard with a microplane grater and serve immediately.


This vegetable has the most interest flavors. The leaves taste texturally similar to spinach and yet the stems are deliciously sweet and tender. The husband thought that the stems tasted strangely similar to fruit loops cereal... I guess you'll have to try them yourself to find out!

Full recipe can be found here.

Happy Wednesday!

Tuesday, September 7, 2010

三杯雞 (Basil Chicken)

A few months ago, I was craving everything Taiwanese and missed the street foods that populate every street corner of the tiny island. I stumbled upon this website and felt inspired.

Here is a variation of that recipe with my 6 little drumsticks.

1.5 lbs of chicken drumsticks (typically the drumsticks are chopped into 2-3 pieces, but alas I have no butcher knife)
10 cloves of garlic (smashed or coarsely chopped)
10 slices of ginger

1/3 of 1/3 cup of rice wine
1/3 of 1/3 cup of soy sauce
1/3 of 1/3 cup of sesame oil (hence the 3 cup name of the dish)

1 tbsp sugar

Thai basil (a large bunch, leaves plucked)


In a large nonstick pan, heat up sesame oil with garlic and ginger until oil just begins to bubble. Add chicken and stir to brown pieces on all sides a little bit.


Add rice wine, soy sauce, and sugar. Stir until boiling, then cover. Let simmer on medium until chicken is cooked through, usually somewhere between 5-10 minutes depending on how large the chicken pieces are.

Remove cover. Stir in basil and allow the sauce to thicken into glaze. Serve over rice.

I let my sauce cook and reduce around the chicken until it became a glaze around the drumsticks. *Hint: If your chicken is not cooked and the sauce looks like it is thickening and going to dry out, add water (1/4 cup at a time) to give your chicken more time to cook and to not let your sauce burn.


Unrelated note: Peacock Salad

Jason and I made this one up tonight, but it was smashingly delicious.


Lay out your romaine lettuce and drizzle with your favorite italian vinaigrette. Lay down some tomatoes and shave off slices of parmesan cheese (this was aged 1 year) on top. Salt and pepper to taste. Consume with fingers or fork and knife. Either would be appropriate.

Doesn't it look like the tails of a peacock all spread out and pretty?

Happy Tuesday!

Monday, September 6, 2010

Salvaged, Now Loved

I found this shirt in a store closing that was sadly ripped in the sleeve. However, I had been looking for navy striped tank for a while and decided to try to salvage this poor shirt.

Notice that there are cute little cloth and button tabs that hold up the sleeves, which I transplanted to the top of the tank.


Not a bad for a little elbow grease and needle and thread! I'm always for a little hand sewing if it means a chance to be creative and thrifty!

Classic Meatballs

With access to organic ground beef and sweet italian sausage, I decided to make some classic meatballs this weekend. This recipe is a variation of Mark Bittman's recipe in How to cook everything.

First, soak 1/2 cup breadcrumbs in 1/2 cup of milk. I didn't have processed breadcrumbs so I used some bread and ripped it into little pieces.


Saute 1/2 cup of minced onion in some olive oil (or butter) until soft.


Combine breadcrumbs with milk, onions, 1 egg, 2 lbs of meat (your choice of beef, lamb, pork, chicken, turkey, etc), and salt and pepper to taste.


Roll out the meatballs approximately 1-1.5 inches in diameter.


To cook the meatballs you can either sear them in a nonstick pan with some butter (or olive oil). For a leaner option you can roast the meatballs in the oven 375 degrees for 20-30 minutes, shaking the meatballs occasionally to evenly roast the meatballs.

In the meantime, you can prep your favorite tomato sauce. I like to make mine sweeter than the average sauce to cut the acidity (just add some sugar).


Final Product.


Top with some chiffonade basil and you have an entree when coupled with fresh pasta or a mini-appetizer like this!

Happy Labor Day!

Thursday, September 2, 2010

How to: Floral Pin

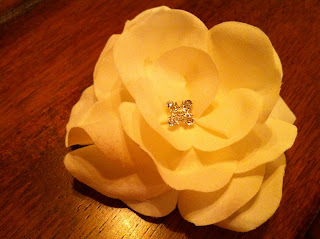
A few months ago I made two floral clips and had some extra materials so I decided to create a step-by-step guide for people who would like to make their own silk floral pins.

First you need to purchase silk flowers from your local craft store and cut off all of the petals. You'll also need felt that is similar in color to your flower petals (or not based on your preference). You can use an alligator clip so that the floral can be pinned in hair or use a safety pin that allows you to pin the floral on clothing. I only had a safety pin so this is what I used.

Materials:
Silk flower
Felt
Charm (optional)
Thread
Safety pin
Alligator clip

Equipment:
Needle
Hot glue gun


Begin by gathering the petals in a circular shape and sewing each petal on top of each other. As you add more petals continue to sew them to the inside of the cluster working from outside in. To get some more dynamic shapes you can fold or shape the petals before you sew them to create more volume or depth.


Once you have the flower shape that you like, you can insert the charm and also secure it with needle and thread to the middle of the flower.


The backing is created by cutting felt into a circle that approximately covers the middle portion of the flower. You can adjust the size based on how much of the back of the flower you want covered by felt (or how much of the back of the flower you need to hid because your sewing is messy).


Then cut two little slits into the middle of the felt circle so you can insert the non-needle end of the safety pin through the felt.


To secure the felt and safety pin to the back of the flower use hot glue and focus on the middle of the flower first.


Then work your way around the edges of the felt securing it to the petals all around the flower.


Once this has been secured and the hot glue is dry, you will have a new accent piece for boring tank tops or t-shirts that are made instantly more glamorous with your floral pin.


a la SJP: