Friday, July 29, 2011

Pasta with Creamy Leek and Garlic Pesto

A few weeks ago Mark Bittman share this recipe on the NYTimes, which The Husband had to try. It's actually quite rare for us to buy leeks because as The Sister likes to say, "Leeks just look like scary green onions." However, if cooked enough they are quite sweet and flavorful.

We recently watched Jacque Pepin make a Leek and Potato Soup on PBS, where he quartered the leeks length-wise to wash. You'd be surprised how much dirt comes out of the tightly wrapped layers of leek. So make sure you use this technique and wash thoroughly!


Pasta with Creamy Leek and Garlic Pesto

Ingredients

3 tablespoons extra virgin olive oil, or as needed
4 ounces bacon, chopped
4 or 5 garlic cloves, thinly sliced
About 1 1/2 pounds leeks (2 or 3 large), trimmed, well rinsed, and chopped
Salt
1 egg * The Husband adds 2 to make it super creamy
1 cup chopped fresh parsley leaves, plus more for garnish
Black pepper
8 ounces any pasta
* Parmesan cheese is added on every pasta dish at our house

Directions
1. Heat 1 tablespoon of the oil in a medium skillet over medium-high heat; add the bacon and cook, stirring occasionally, until just beginning to crisp, 8 to 10 minutes. Remove the bacon from the pan with a slotted spoon and drain it on paper towels.


2. Turn the heat to medium. Add the garlic and leeks to the skillet, along with another tablespoon or so of oil if needed to keep things from sticking, and cook, stirring occasionally, until very soft, 20 to 30 minutes.


3. Meanwhile, bring a large pot of water to a boil and salt it. Transfer the garlic and leeks to a blender or food processor with the egg, parsley and a sprinkling of salt and pepper. Process, stopping to scrape down the sides of the container if necessary. Return the purée to the skillet, off heat.


4. Cook the pasta in the boiling water until it’s tender but not mushy, then drain, reserving some of the cooking liquid. Turn the heat under the leek mixture to medium, add about 1/4 cup of the reserved cooking liquid to thin the pesto, and toss in the pasta, adding more liquid as needed. Taste and adjust the seasoning, garnish with the bacon and more parsley, and serve.


We are always descending on this dish so quickly that I forgot to take the picture while it was plated! This dish is super simple and you can see how easy it is on Mark Bittman's video demonstration

Hope you have a great weekend. Next week, I'll be sharing pictures and posts from the Bizarre Food Challenge that is tonight. Stay Tuned!


Thursday, July 28, 2011

Things of Happiness

We've been too busy lately to be cooking nightly so no new recipes to post until next week. For our birthday party, we're making an America's Test Kitchen cake, which I am super excited for. In lieu of new food posts, here are a few things that are bringing me happiness this week. 

The Husband's Mexican Martini in Durham, NC.


Birthday lilies with the most gorgeous colors. 


Bargain Find! Best of the Best (volume 11). A compilation of the best recipes from the 25 best cookbooks of the year from the editors of Food and Wine magazine. I found this for $2! 


Have a great Thursday! 

Monday, July 25, 2011

Let Them Eat Cake!

Believe it or not, it has officially been a year since I began blogging. Honestly, I can't believe that this blog has remained active after all this time. A full year of cooking, eating, and writing has brought me so much joy and relaxation during some big transitions and great dinner parties.

Incidentally, my blogiversary (see definition here if confused) is also around the time of my birthday! This year, The Husband and I are channeling our love for food by celebrating with friends over a birthday Bizarre Food Challenge.

The Challenge: Bring what you believe to be a bizarre or unique food (no brains or raw insects please -- we don't want no prion disease).

Can't wait to share the pictures and reactions to this event! Looking forward to what exciting foods our foodie friends will share with us this Friday.

Confession: I've never made a real cake. Ever. So to celebrate the momentous occasion, I bought a pretty cake stand, which also doubles as a trifle or punch bowl (genius). Cake and bizarre treats to come soon!


Have a great Monday!

Friday, July 22, 2011

Tom Yum Goong

There is a restaurant in Dallas, TX called Royal Thai. I wish I could transplant this restaurant to NC because they have the best Tom Yum Goong that I've ever tasted. This is a spicy, sour soup that can have chicken, shrimp, and often mushrooms. My favorite way to eat this soup is to turn it into a noodle soup by ordering steamed rice noodles on the side.

We recently made a shrimp dish, which left us a generous portion of shrimp heads and tails. The Husband suggested making a shrimp broth, which I learned just means boiling something (i.e., meat, vegetable) in water whereas a stock is where you may add onions, garlic, bay leaves, and other herbs.

So, I let the shrimp parts boil for approximately 45 minutes in water and then strained the broth to make my Tom Yum Goong. I had to improvise this recipe a bit because I didn't have the exact amount of shrimp and I cannot find kaffir lime leaves here. I also bought an additional pound of shrimp aside from the leftover heads that I used to make the shrimp broth.

Tom Yum Goong
Ingredients
500 g (1 lb) medium-sized raw prawns
1 tbsp oil
2 quarts of water * I substituted this with the shrimp broth
2 tbsp red curry paste
2 tbsp tamarind concentrate
2 tsp turmeric
1 tsp chopped red chilies, optional
4 kaffir lime leaves, shredded ** or a lot more lime juice if you can't find it
2 tbsp fish sauce
2 tbsp lime juice **
2 tsp soft brown sugar
1/4 cup fresh coriander leaves * couldn't find this either so skipped
Rice noodles, optional to make noodle soup
Your choice of mushrooms

Directions
1. Remove shrimp shell and heads. Devein shrimp and set aside.

2. Heat oil in wok or pan. Add the shrimp shells and heads and cook over medium-high heat for 5-7 minutes until shells and heads are a deep orange. Then turn heat to high.


3. Gradually add 1 cup of shrimp broth/water and the curry paste to the wok. Boil for 5 minutes, until reduced slightly. Add the remaining water and simmer for 20 minutes. Strain and reserve the soup. Discard shrimp heads and shells. Return the soup to the wok. 


4. Add the tamarind concentrate, turmeric, chilies, and lime leaves and bring to a boil for 2 minutes. Add the peeled, deveined shrimp and cook until they are pink, but not overdone.


5. Stir in the fish sauce, lime juice, and sugar. Add cooked rice noodles if desired. Sprinkle with coriander  (or cilantro) leaves just before serving. 


I've tried making this soup once before based on a Tyler Florence recipe, which used galanga and lemongrass. However, that recipe was not nearly as flavorful as this one. I think this is related to the red curry paste and some of the other seasonings. This is probably as close as I'll ever get to Royal Thai, but at least I can have a quick fix before our next trip back to DFW!

Have a restful weekend and some good eats!

Wednesday, July 20, 2011

Durham Food Trucks: Part 3

The Husband found a deal for Slippin Sliders, which is a food truck that occasionally parks in Durham near Fullsteam and MotorCo on Rigsbee. We found them on a hot afternoon next to Fullsteam, just as they were opening for the night. 

We got everything on the menu except the Teriyaki: 4 sliders for $10.


The Diablo. 


The West Coast. 


The Texas. 


The Turkey Apple Jack. 


Overall consensus was that the sliders with bacon were quite good. They also had some pretty tasty aiolis and remoulades. The bun is quite soft and the meat is thin so every bite is a little mushy with all of the sauces and veggies. My favorite was the Texas (naturally) and the West Coast had a great sauce. 

While I understand that sliders are "mini" burgers, I'm just not quite a fan yet because if I wanted to eat a great burger, why would I want it to be "petite-sized"? At $10 for 4 sliders, it's not a bad deal if you find a coupon or a daily deal. Unfortunately, I'm still not quite convinced that the genre of sliders is a bona fide food category. 

I hope Durham continues to attract food trucks, as it's great to see this movement growing in the midst of the locavore, foodie crowd in the area. 

May your food truck trekking continue this week! 

Monday, July 18, 2011

Spinach and Mushroom Stuffed Chicken Breast

Do you ever have those chicken breast that have been defrosted in your fridge for days and yet you can't find a way to use them? I had one of those "mustcleanoutthefridge" moments this week. Frozen bag of spinach. Check. Mushrooms and shallots. Check. Chicken breast. Check. Check.

This recipe was from Rachel Ray, which I have to admit, is not my go-to TV personality for recipes, but it fit the bill for all the ingredients I had in the fridge. You pretty much pound out the chicken breast and make the spinach and mushroom stuffing. Then stuff the chicken and pan sear until everything is nice and cooked. 

The result was flavorful spinach and mushroom filling and juicy, tender chicken. Not bad for a clean-out-the-fridge kind of meal. 


I would recommend butterflying the chicken and then stuffing, otherwise you get a frankenstein looking stuffed chicken, which is just as yummy in the end. 


Making the gravy by de-glazing the pan afterwards with flour, wine, and chicken stock. 


Overall, a great dinner. The Husband said it was a good "next day" lunch. This is certainly more worth the effort if you make 4-6 breasts at a time since the stuffing and gravy also take some time to make. This will continue our search for ways to make chicken breast that is juicy rather than dried out and stale. 

Have a great Monday! 

Friday, July 15, 2011

Bulgar Stuffed Poblano Peppers

My initial thought after purchasing poblano peppers from our local mexican mart was to make chile rellenos, until I read the actual recipe for Rick Bayless's chile rellenos. While the recipe looks delicious, I couldn't find the time to make this recipe nor could I get myself to fry these in our kitchen since our last potato chip adventure left an oily odor in our house for days. 

So, I decided to use what I had to make the best Thursday night dinner I could think of. The bulgar was something that I had on hand and I just made this recipe up, so measurements are estimates. 

Bulgar Stuffed Poblano Peppers

Ingredients
4-5 poblano peppers, roasted in the oven until blackened
1 sweet long red pepper, roasted until blackened
1/2 onion, chopped
1/2 lb of your favorite sausage or ground pork
1/2 cup of corn
1 cup of bulgar
1 3/4 cup of chicken stock or water 
Taco seasoning to taste
Salt and pepper to taste

Directions

1. Place poblano and red peppers in the oven under the broil setting, approximately 6-8 minutes on each side until fully blackened. Then place peppers in a bowl of water or in a brown paper bag to allow the steam to loosen the skin from the meat of the pepper. 


2. Heat chicken stock until at full boil, then pour in bulgar and turn heat to lowest setting. Cover and let simmer for 10 minutes. Turn off heat and let sit for another 15 minutes. 

3. Loosen the skin of the peppers. For the poblano peppers, cut a slit in the skin and remove all the seeds. Deseed and chop the roasted red pepper. 

4. Saute onions until tender then add the sausage. Add the corn, roasted red pepper and taco seasoning. Include additional salt, pepper, or cumin to taste. 

5. Add the cooked bulgar to the onion, corn, and peppers. Season again based on your preference. 

6. Fill the poblano peppers with the bulgar mixture. You may need to use a toothpick to secure the pepper if it is too tender, which happened to me. 


7. When ready to eat, top the peppers off with cheese and place under the broiler for 7-10 minutes, until the cheese is browned and boiling. I wrapped each pepper in foil because I was worried that they might burst open and the bulgar would pour out, which was not a problem at all. 


8. Serve with refried beans, cheese, or salsa of your choice.  


Certainly not the same as a fried, stuffed chile, but this was otherwise healthy and the flavors packed quite a punch given that the poblano peppers have some heat as well. The Husband and Sister cleared their plates in a few minutes and wanted more. 

For as picky as these two are, you can't complain about that. :)

Have a great weekend and some delicious weekend meals! 

Monday, July 11, 2011

Our Favorite Chocolate Chip Cookie

This is one of our staples during rainy days or when we need to make a comforting treat for a party. You can never go wrong with having a classic chocolate chip cookie recipe in your pocket. This recipe produces cookies with a crispy bottom, soft chewy center, and oozy chocolate chips. Again, Mark Bittman was the source of this recipe. 

Classic Chocolate Chip Cookies
Makes: 3 to 4 dozen

Ingredients
1/2 pound (2 sticks) unsalted butter, softened
3/4 cup granulated sugar
3/4 cup brown sugar
2 eggs
2 cups all-purpose flour
1/2 teaspoon baking soda
1/2 teaspoon salt
1 teaspoon vanilla extract
2 cups chopped good-quality semisweet chocolate (about 8 ounces)

Directions
1. Heat the oven to 375°F. Use an electric mixer to cream together the butter and sugars; add the eggs one at a time and beat until well blended.


2. Mix the flour, baking soda, and salt together in a bowl. Add the dry ingredients to the dough, beat for a moment, then add the vanilla and stir in the chocolate chips.


3. Drop tablespoon-size mounds of dough about 3 inches apart in rows and columns on ungreased baking sheets. Bake until lightly browned, about 10 minutes. Cool for about 2 minutes on the sheets before using a spatula to transfer the cookies to a rack to finish cooling. Store in a tightly covered container at room temperature for no more than a day or two.


These cookies remain chewy for the majority of its shelf life and are obviously awesome with a tall glass of cold milk. Whether it's a rainy Monday or a stressful Tuesday, sometimes you just need a sweet, little pick-me-up.

Have a good Monday!

Friday, July 8, 2011

Caramelized Onion Rolls

To continue along the vein of flavorful breads, I recent tried caramelizing onions to make some veggie burger buns. The caramelization process took approximately 25 minutes and because I didn't use butter I didn't quite get the browning that I would have liked. But I suppose this is healthier.

Caramelized onions with white wine, white wine vinegar, brown sugar, and dried oregano. 


These buns were sandwiched around potato and white bean veggie burgers (recipe here) that we threw on the grill. 


Just in case the veggie burgers were too healthy, we also made salt and vinegar chips. 


Since it will be raining all week, there will be no more grilling for a while. Have a great weekend and enjoy my favorite month, JULY! 


Wednesday, July 6, 2011

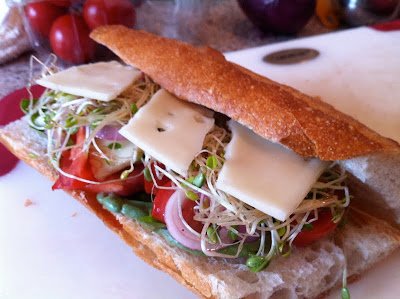
Gazpacho Sandwich

We went crabbing again over the July 4th weekend with our friends B. and A.McD. We stocked up on specialty root beers for the trip while our friends remembered that we needed to eat lunch at some point during the crabbing adventure. 

A.McD packed us these Gazpacho Sandwiches that I am now obsessed with. Since we were under the sun for 5+ hours, this sandwich was the perfect lunch. Light, refreshing, and flavorful. I had to share this because it is simple to make and really delicious. Thanks A.McD for the recipe and for introducing us to these yummy sandwiches. 

Gazpacho Sandwich

Ingredients
1/2 of an 8oz. loaf baguette-style French bread
3/4 cup yellow pear-shape and/or cherry tomatoes, quartered
2 oz. fresh mozzarella cheese, cubed
1/4 cup coarsly chopped cucumber
2 thin slices red onion, separated into rings
1 Tbsp. snipped fresh mint
1Tbsp. red wine vinegar
1 tsp. olive oil
1/4 tsp. salt
1/8 tsp. white pepper
1/2 cup fresh basil leaves

Directions
1.  Cut bread in half crosswise.  Slice each piece horizontally, making bottom piece slightly larger than top piece.  Using a fork, carefully hollow out bottom pieces, making 1/4 in. shells. (I actually did not hollow out the sandwich because we were quite hungry, but it still worked beautifully). 

2.  In medium bowl, combine tomato, mozzarella cheese, cucumber, red onion, mint, vinegar, oil, salt, and white pepper.

3. Line bottoms of bread shells with basil leaves.  Fill shells with tomato mixture; replace tops of bread.  Wrap each sandwich in plastic wrap. Chill for 4-24 hours.  Makes 2 servings.


I used Jarlsberg cheese because we didn't have any fresh mozz at home. 


A wonderful treat for hot summer days. Since these sandwiches need to be chilled, they are really great for picnics or beach trips because you can make them in advance. 

For a real recipe for gazpacho soup, check out our friends' blog

Hope you are able to stay cool this Wednesday! 

Tuesday, July 5, 2011

Happy July 4th Dinner

We were attacked by a hailstorm during July 4th, which foiled our swordfish grilling plans. Instead, The Husband pan seared the swordfish and made a homemade garlic-lemon aioli, which was fabulous. Even The Sister said at the end of dinner, "Man, I want more swordfish!"

Since it has been so hot lately, we've been trying to whip up lighter foods. To accompany the swordfish, I made a Summer Quinoa Salad (recipe here), which was recently introduced to us by a friend. It was absolutely fabulous with the vegetables and dressing. I love the texture of quinoa and it is truly SO easy to cook compared to other grains. We finished the first batch and I already have more quinoa on hand to make another for the week!


Summer Basil Quinoa Salad

Salad Ingredients

1 cup Quinoa-rinsed
1/2 of a Red Onion-sliced
2 whole Tomatoes-chopped
1 Cucumber-peeled and chopped
1/2 cup fresh Basil-chopped
1/4 cup Pine Nuts-quickly toasted in a dry pan until fragrant and set aside for garnish
Dressing Ingredients
4 Garlic Cloves-minced
1 1/2 teaspoons Lemon Juice
3 tablespoons Balsamic Vinegar
1/2 teaspoon Crushed Red Pepper
1/2 teaspoon Sea Salt
1/2 teaspoon Dijon Mustard
1/4 cup Extra Virgin Olive Oil
Directions
1) Bring 2 cups of water to a boil, add Quinoa, cover and simmer over low heat for about 15 minutes or until water is fully absorbed. Set aside and let cool.
2) Whisk together all dressing ingredients except Olive oil. When combined, slowly whisk in Olive Oil, a little at a time to allow oil and vinegar to mix.
3) Toss all salad ingredients with dressing and garnish with Pine Nuts.

A tasty and healthy way to start the short week. Have a great Tuesday! 

Friday, July 1, 2011

Blueberry Jammin'

It's blueberry-picking season and there is certainly no shortage of blueberries in North Carolina. We took The Family to Herndon Hills Farm, which has a whole field dedicated to these blue gems. After picking almost 4 lbs of blueberries, we were ready to learn how to make some blueberry jam from SDK (thanks!).


Blueberry mashing. 


Ingredients to cook with blueberry mash: sugar, cinnamon, nutmeg, butter, sure jell, and brandy.


Sterilizing the jars.


Beautiful blueberry jam. 


We had this jam the next morning with biscuits. It was simply sinful. After giving several jars away, we only have 2 left! The Sister says that she has found a new hobby and plans to pick more berries for more jamming. I think I want to try making hot pepper jam next! Shout out to SDK for teaching us a useful and delicious hobby :).

Happy early July 4th weekend with friends and family. Don't forget to go blueberry picking if possible!