Showing posts with label diy. Show all posts

Wednesday, May 11, 2011

Grocery Bag Dispenser

One of my biggest pet peeves is having a cabinet stuffed with assorted grocery bags. Every time I open that specific cabinet all of the bags come tumbling out on to the kitchen floor and I have to spend time stuffing them back in. So for weeks I've been thinking about how I can create a grocery bag dispenser with the leftover green fabric from my other DIY project. 

I've been wanting to try some stenciling, as inspired by many of the DesignSponge DIY projects. So here was my first attempt. 


Sewing the dispenser was actually quite easy. It was the stenciling that was more difficult given the ridges on this canvas fabric. I used the tip of my scissors to smooth out the edges of the stencil. I think it worked out just fine. 


No more messy cabinets for me! 

Wednesday, April 27, 2011

E's Butterscotch Floral Scarf

With all the leftover yellow yarn, I decided to practice some more crocheting by making a scarf, which will not be worn until next winter. I made this up as I crocheted except for the florals, which I learned here. 

Begin with a long chain, which will determine how wide the cowl-style scarf is around your neck. Then double crochet a bajillion times until your scarf is at the thickness that you want. The Husband called it a "mobius scarf" because it is perpetually twisted like a Möbius strip (for all you nerds out there). 


I love the texture of the florals and how the petals grow based on the number of stitches. Although it is already spring (feels like summer!) and hardly scarf weather, this mustard yellow scarf will make any drab winter day POP.

Wednesday, April 6, 2011

The Scrap Exchange

To add to my growing list of things that I love about Durham, 2 weekends ago The Husband and I rifled through the piles and piles of fabric at the semi-annual Scrap Exchange fabric sale. It was in the warehouse next to the main shop. The clientele ranged from grandmothers to young hipsters out to find their next DIY project... 

What I love about The Scrap Exchange is that it is filled with unexpected surprises and items that have been broken down to their component parts (i.e., tubs of buttons from jeans, zippers separated from jackets) which then allows your imagination to run wild to make something useful out of something recycled and reused. 

In my opinion, the spoils were aplenty, but several of the veteran riflers suggested becoming a Scrap Exchange member to get early access to the goods for the next sale in October. I am seriously considering it, however, I think I have enough fabric to last me all year for projects. 


In my excitement, I went home and promptly started and finished my first project. We found a roll of this durable blue canvas material (for $1!) and I instantly thought of making The Husband an apron for our summer grilling adventures (to prevent any more oil stains on perfectly-good shirts). I didn't have a pattern and actually drew a childlike sketch before starting, but I think it turned out decently. 


My favorite part is the large pocket that you may or may not be able to see. I thought sewing pockets would be super hard, but it turned out alright. 


If you live in Durham, you must check out The Scrap Exchange even if it's just to walk around in fascination with all the random objects that one can collect in one store.

Have a good week! 

Wednesday, March 23, 2011

Knitting Needle Case

I have always coveted after the DIY projects on DesignSponge, but never had the courage or energy to try any. However, I decided that this project was just too cute to ignore. I also just happened to need a way to store my random knitting needles so they can hibernate until next winter.

I found 2/3 yard canvas fabric at JoAnn fabrics for $2.44 total:


Securing pins to set the lines with an iron:


Drawing lines for the different needle pockets:


Then, sew sew sew sew... I used twill tape on the edges to create a finished look.


Now it looks like I need more knitting needles:


The final product all wrapped up for the summer.


Not bad for not using a sewing machine since home economics in 6th grade. Thanks Miss. Petrucelli for teaching me how to thread a sewing machine and wind a bobbin.

Why do they call it home economics?

Monday, February 14, 2011

Valentine with Cheese

I was sick for what seems like forever and had a few nights to myself the weekend before Valentine's Day. Making greeting cards has always been a great money-saving option, but on top of that you can add so much more personality to homemade cards.

The Husband and I like to leave little notes around the house that say "I love you like [insert] loves [insert]!" 

For example, "I love you like bears love honey" or "I love you like peanut butter loves jam." Quite cheesy, I know. (Hence the "cheese" in the blog title).  

This year I decided that our love for cheese (second cheese reference) couldn't be ignored. So here's the valentine I made The Husband. 


Sorry about the crappy picture lighting, but you get the picture ;). If you pull on the little heart, the crash-dummy mouse (helmet and all) goes flying towards the cheesy moon (the final cheese)!

Happy Valentine's Day everyone!

May you all feel as loved as the cheese. :)

ps: Full Valentine's meal post to follow!

Wednesday, November 24, 2010

Let's get crafty: Crochet Hat

I recently decided that I was going to teach myself how to crochet having coveted after the beautifully designed scarves and hats. I first made a hat with a single crochet stitch for practice, but then graduated myself to this hat. The youtube instructions can be found here and written instructions here.

I believe I used 4 ply yarn and I only had a H crochet needle, but it still worked in my book.

I used my favorite model for this project.


The hat seemed to look like a little sombrero on KK.  Here is what it looks like on a human head.


Family and friends, don't be surprised if these come your way for Christmas! 

Happy crocheting! 

Monday, September 6, 2010

Salvaged, Now Loved

I found this shirt in a store closing that was sadly ripped in the sleeve. However, I had been looking for navy striped tank for a while and decided to try to salvage this poor shirt.

Notice that there are cute little cloth and button tabs that hold up the sleeves, which I transplanted to the top of the tank.


Not a bad for a little elbow grease and needle and thread! I'm always for a little hand sewing if it means a chance to be creative and thrifty!

Thursday, September 2, 2010

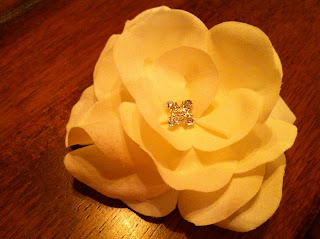
How to: Floral Pin

A few months ago I made two floral clips and had some extra materials so I decided to create a step-by-step guide for people who would like to make their own silk floral pins.

First you need to purchase silk flowers from your local craft store and cut off all of the petals. You'll also need felt that is similar in color to your flower petals (or not based on your preference). You can use an alligator clip so that the floral can be pinned in hair or use a safety pin that allows you to pin the floral on clothing. I only had a safety pin so this is what I used.

Materials:
Silk flower
Felt
Charm (optional)
Thread
Safety pin
Alligator clip

Equipment:
Needle
Hot glue gun


Begin by gathering the petals in a circular shape and sewing each petal on top of each other. As you add more petals continue to sew them to the inside of the cluster working from outside in. To get some more dynamic shapes you can fold or shape the petals before you sew them to create more volume or depth.


Once you have the flower shape that you like, you can insert the charm and also secure it with needle and thread to the middle of the flower.


The backing is created by cutting felt into a circle that approximately covers the middle portion of the flower. You can adjust the size based on how much of the back of the flower you want covered by felt (or how much of the back of the flower you need to hid because your sewing is messy).


Then cut two little slits into the middle of the felt circle so you can insert the non-needle end of the safety pin through the felt.


To secure the felt and safety pin to the back of the flower use hot glue and focus on the middle of the flower first.


Then work your way around the edges of the felt securing it to the petals all around the flower.


Once this has been secured and the hot glue is dry, you will have a new accent piece for boring tank tops or t-shirts that are made instantly more glamorous with your floral pin.


a la SJP:

Friday, July 23, 2010

DIY

Project of the month: floral hair clip!


So glad it's weekend.